Self-Made Lace To Toe
Austrian Cow Leather, vegetable Tanned, (reversed) waxed flesh
Taken on September 2, 2023
Maker
Self-Made
Model
Lace To Toe
Leather
Last
Sole
More about this item
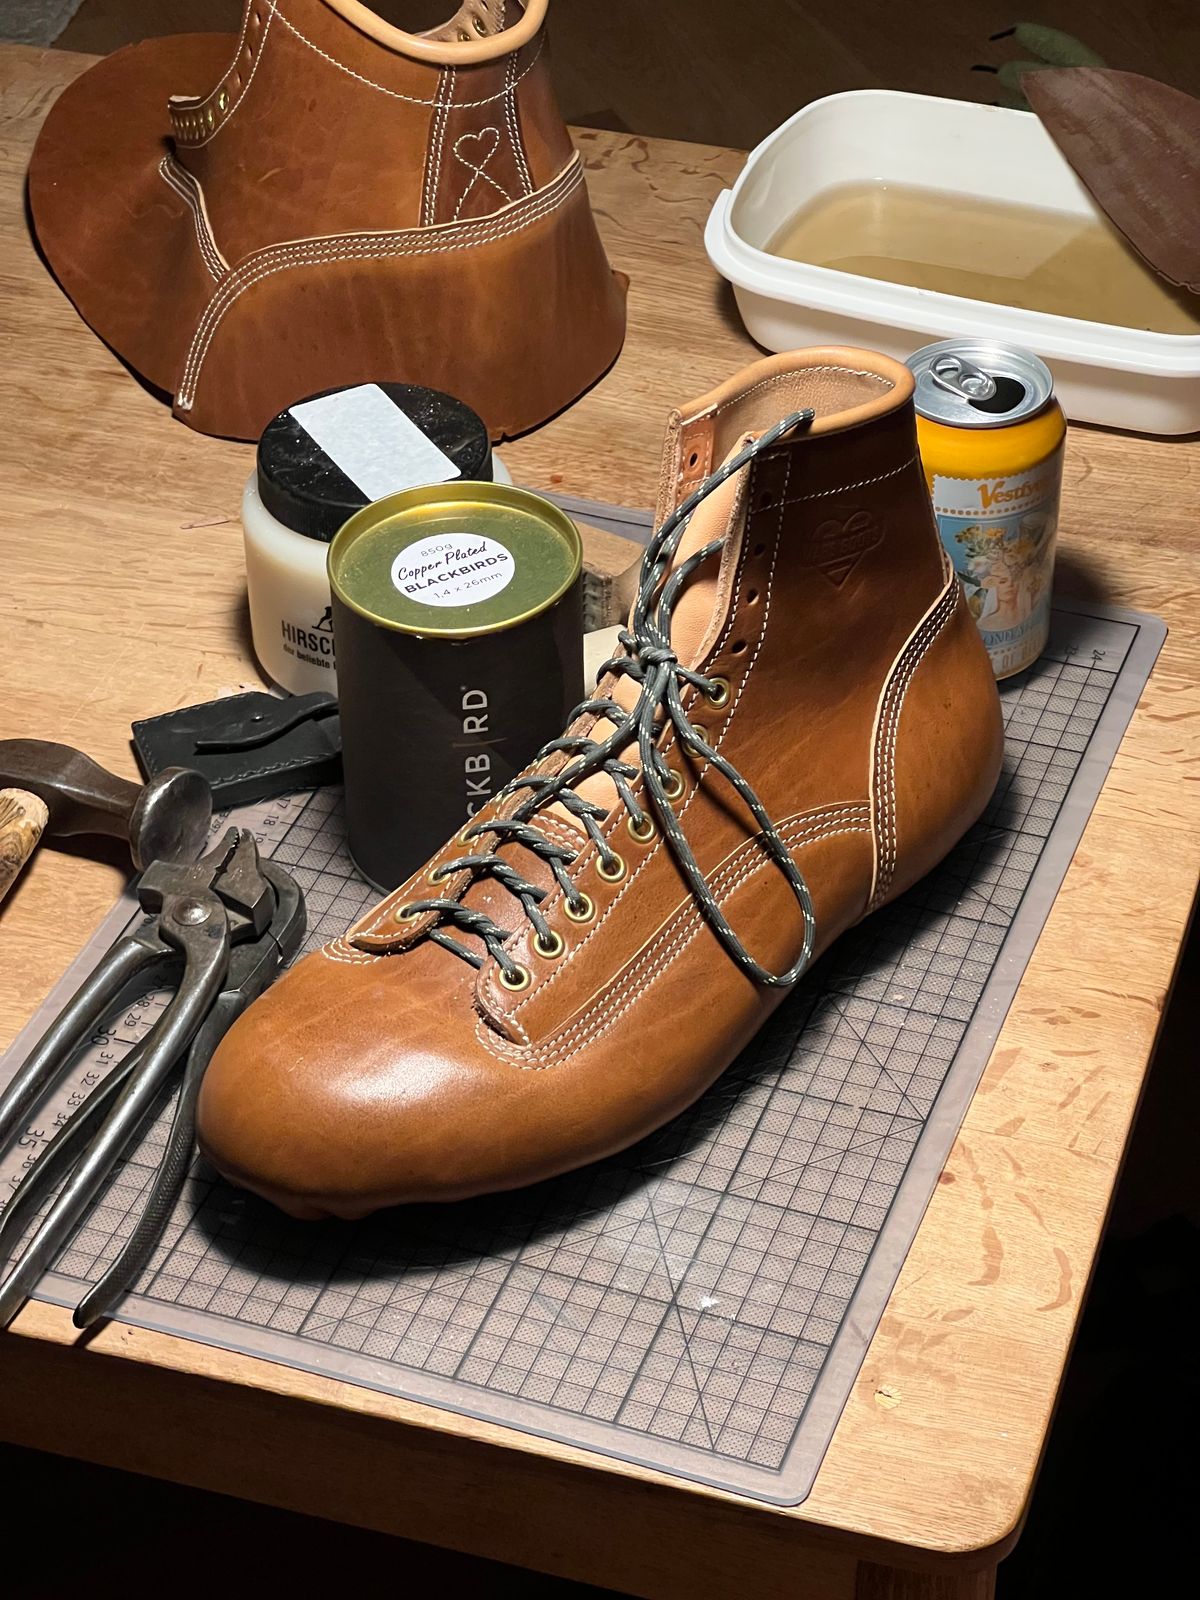
Boot making is a hobby for me and this is the second pair of boots (or any footwear) I’ve made. Self taught and learning as I go along. A big shout out to the incredibly helpful shoemaking community on Reddit, Instagram and Discord! The LTT pattern for sure was a head ache. The leather is a very robust (2,7mm) cow leather, which is meant to be used as a waxed flesh (flesh side out) but I used it with the skin side out. The cows spend their summers on high alpine meadows and their winters in the valleys. It is treated with natural waxes and train oil and comes from a small Austrian Tannery and purchased via the lovely folks at Kolde in Vienna. Insole is 5,5mm from Baker, Midsole is 5mm from Martin. The lasts are 3D-printed on an Ultimaker FDM printer in PETG and CAD-modeled in Rhino by myself. They split into 3 parts and I’ve made some manual modifications before lasting.Why I own this
When choosing what style to make for my second pair it was easy because LTT boots have fascinated me for a long time. I wanted to make a pair of boots that I can wear in any situation like the office but also for the (often rainy) commute by bike in Copenhagen, when traveling or doing light chores around the house and garden. Last: I decided to go for a slimmer toe shape as I’m not a fan of bulbous toes and it’s a bit more fitting for the office. I modeled the lasts with a somewhat conservative 22mm heel. Leather: after a visit to a wonderful leather dealer in Vienna that’s specialized in shoemaking leathers it was clear that this was the only choice as it was vegetable tanned, robust and had lots of character. And I like that it comes from cows that spend their summers on high alpine meadows in Austria. Sole: buying interesting soles as an amateur with a business account turns out to be very challenging. I deliberated between white and green Dr Soles Supergrip full soles and heels that I’ve ordered from Taiwan and ultimately went for white. Construction: There’s extremely little information to be found on the pattern of LTT boots and my best clue was two screenshots I took from a video of a production tour at White’s. That’s why my quarters go all the way to from the centerline at the Achilles heel to the toe and are then covered by the vamp which I glued together. That might explain why there’re almost no collapsing of the toebox. The heel has a very sturdy 3,5mm heel stiffener made from JR’s oak bark tanned leather and there’s parts around the heels where there’s four layers of leather for a combined 10mm thickness. The boots are completely unlined. Stitchdown construction and midsole and outsole are saddle stitched. Hardware: details matter greatly so I’ve ordered this specific type of speed hooks (that I believe the PNW makers use) from the US but unfortunately the die setter (with imperial threads) did not fit into my metric press so I had to improvise and set them by hand (and did not do the best job)! I decided on brass over silver eyelets and speed hooks early on as it compliments the leather imho. Details: the rolled edge on the top is very fun to make and adds a lot of comfort and a bit of refinement. To make it feel like a real boot from a “real maker” I made a quick logo (and chose a canoe and heart as I’m tired of all the overly aggressive axe/beard/bear/skull-logos. The logo stamp was also 3D-printed and can be seen on the ankles. I’ve since ordered a machined stamp in brass. The heart also appears again as a stitched detail on the heel stay. I chose a relatively thick (to match the robust leather) cream colored thread (size 20 in Europe) which forced me to try my best in sewing accurately. The sock liner features my initials, again made with a 3D printed stamp. On the insole the layered lines from the 3D printed lasts are still visible.
How I sized
For my first pair of shoes I’ve ordered custom made wooden lasts but due to miscommunication they turned out unusable. After modifying them and making my first pair I knew that I need to start from scratch and used a wonky iPhone 3D-scan as a base to CAD-model my last. My feet are fairly large, flat and wide with a low instep and volume and narrow heel. My big toe is very large and straight which made it challenging to find a compromise that was comfortable and visually acceptable.
Ordering process
Not applicable. Self-made.